
before we begin always see the Documentation and examples provided by the creators !
Why you would do this
it can be a one stop shop for authentication to all new apps / projects you’d create in the future. or for authentication with other services across your home lab.
how it works
basically the identity server becomes a trusted authority that a user would use to access their data in another application that also trusts the server.
this is how single signOn works in a very basic view, a better explanation here
setup
- you need to install the templates that allows ya to spin up an identity server
- create a project
1
2
3
dotnet new --install Duende.IdentityServer.Templates
dotnet new --list # will list all available projects you have
dotnet new isapid -o \<where u want it\>
- create a project
- change the stock project url in
appsettings.json1
"applicationUrl": "http://localhost:5000"
- by default the server will use a
sqlite3database, you can replace it, i’ll use postgresNpgsql.EntityFrameworkCore.PostgreSQL - don’t forget to change the Db url in
appsettings.jsonand add it’s configappsettings.json
1
"DefaultConnection": "Server=localhost;Port=5432;User Id=admin;Password=admin1234;Database=AspIdUsers"
HostingExtensions.cs
1
options.UseNpgsql(builder.Configuration.GetConnectionString("DefaultConnection")));
- delete the already existing migrations unless you didn’t change the DB provider
- create new ones that will correspond to whatever u chose.
1
2
dotnet ef migrations add <give it a name> -o Data/Migrations
dotnet ef migrations add changedDBProvider -o Data/Migrations
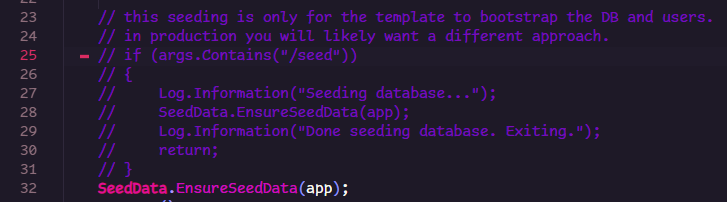
- there’s one thing i like to do, which is alter the way the seeding is done ; instead of a prompt in the terminal if u’d like to seed or not i just make it automatic:
comment the
ifstatement @line 25, and put theSeedmethod call b4 theapp.run![IdentityServer_seeding]() while you’re at it u may wanna adjust the default users in there as well but i change them after i ensure everything is working.
while you’re at it u may wanna adjust the default users in there as well but i change them after i ensure everything is working.
- you should test at this point,
cdinto the directory and1
dotnet build && dotnet watch
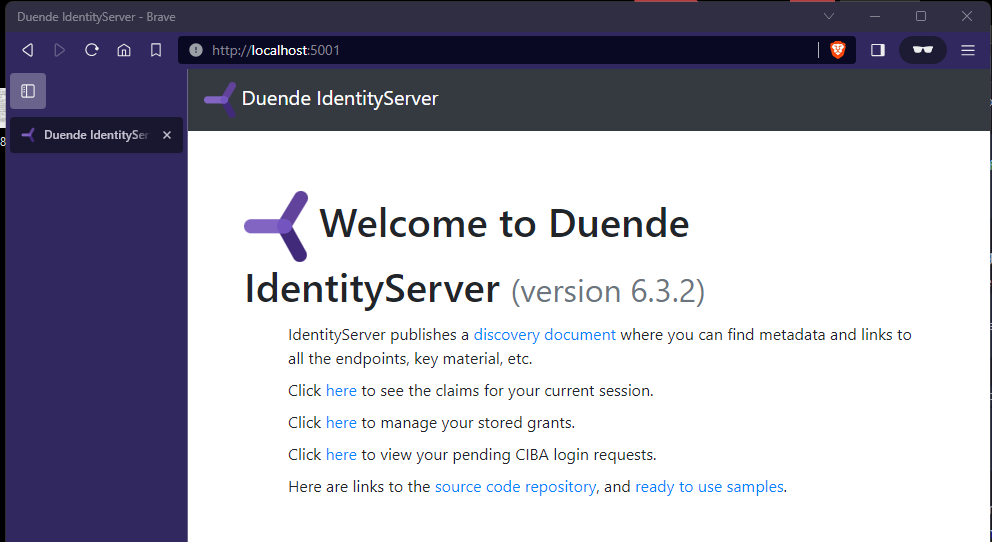
- if all is well, navigate in your browser of choice to the application url and you should see a welcome page similar to this:
![IdentityServer4_welcomePage]()
add a Register page
we need to be able to add more users without messing with seeding data or a DBMS
- in the
Pagesfolder create a new folder called Register w/ the following pagesIndex.cshtmlIndex.cshtml.csRegisterViewModel.cs1 2
# why can't powershell do this ;=; mkdir Register && touch Register/Index.cshtml Register/Index.cshtml.cs Register/Index.cshtml Register/ViewModel.cs
Index.cshtml
1
2
3
4
5
6
7
8
9
10
11
12
13
14
15
16
17
18
19
20
21
22
23
24
25
26
27
28
29
30
31
32
33
34
35
36
37
38
39
40
41
42
43
44
45
46
47
48
49
50
51
52
53
54
55
56
@page
@model <YOUR APP>.Pages.Login.Index

<div>
    <partial name="_ValidationSummary" />

    <div class="row">
        <div class="col-6 offset-3">
            <div class="card">
                <div class="card-header">
                    <h2>Register</h2>
                </div>
                <div class="card-body">
                    <form asp-page="/Account/Register/Index">
                        <input type="hidden" asp-for="Input.ReturnUrl" />

                        <div class="form-group">
                            <label asp-for="Input.Username"></label>
                            <input class="form-control" placeholder="Username" asp-for="Input.Username" autofocus>
                        </div>

                        <div class="form-group">
                            <label asp-for="Input.Email"></label>
                            <input class="form-control" placeholder="Email" asp-for="Input.Email">
                        </div>

                        <div class="form-group">
                            <label asp-for="Input.FullName"></label>
                            <input class="form-control" placeholder="Full name" asp-for="Input.FullName">
                        </div>

                        <div class="form-group">
                            <label asp-for="Input.Password"></label>
                            <input type="password" class="form-control" placeholder="Password" asp-for="Input.Password"
                                autocomplete="off">
                        </div>

                        <a class="pb-2 d-block" asp-page="../Login/Index" asp-route-returnUrl="@Model.Input.ReturnUrl">
                            Already registered? Login here
                        </a>

                        <button class="btn btn-primary" name="Input.Button" value="register">Register</button>
                        <button class="btn btn-secondary" name="Input.Button" value="cancel">Cancel</button>
                    </form>
                </div>

                @if (Model.RegisterSuccess)
                {
                    <div class="alert alert-success mt-2">
                        <strong>Successfully registered</strong> - You can now login
                    </div>
                }
            </div>
        </div>
    </div>
</div>
Index.cshtml.cs
1
2
3
4
5
6
7
8
9
10
11
12
13
14
15
16
17
18
19
20
21
22
23
24
25
26
27
28
29
30
31
32
33
34
35
36
37
38
39
40
41
42
43
44
45
46
47
48
49
50
51
52
53
54
55
[AllowAnonymous]
[SecurityHeaders]
public class Index : PageModel
{
    private readonly UserManager<ApplicationUser> _userManager;

    public Index (UserManager<ApplicationUser> userManager)
    {
        _userManager = userManager;
    }
    [BindProperty]
    public RegisterViewModel Input { get; set; }

    [BindProperty]
    public bool RegisterSuccess { get; set; }

    public IActionResult OnGet(string returnUrl)
    {
        Input = new RegisterViewModel
        {
            ReturnUrl = returnUrl
        };

        return Page();
    }

    public  async Task<IActionResult> OnPost()
    {
        if (Input.Button != "register") return Redirect("~/");

        if(ModelState.IsValid)
        {
            var user = new ApplicationUser
            {
                UserName = Input.Username,
                Email = Input.Email,
                EmailConfirmed = true
            };

            var result = await _userManager.CreateAsync(user, Input.Password);

            if (result.Succeeded)
            {
                await _userManager.AddClaimsAsync(user, new Claim[]{
                            new Claim(JwtClaimTypes.Name, user.UserName),
                            // new Claim(JwtClaimTypes.GivenName, "Alice"),
                            // new Claim(JwtClaimTypes.FamilyName, "Smith"),
                            // new Claim(JwtClaimTypes.WebSite, "http://alice.com"),
                });
                RegisterSuccess = true;
            }
        }
        return Page();
    }
}
RegisterViewModel.cs
1
2
3
4
5
6
7
8
9
10
11
12
13
14
public class RegisterViewModel
{
    [Required]
    public string Email { get; set; }
    [Required]
    public string Password { get; set; }
    [Required]
    public string Username { get; set; }
    [Required]
    public string FullName { get; set; }
    public string ReturnUrl { get; set; }
    public string Button { get; set; }

}
- now only to add an anchor tag in the login page for easier access
1
2
3
4
<a asp-page="../Register/Index" class="pb-2 d-block"
asp-route-returnUrl="@Model.Input.ReturnUrl">
New User ? Register here
</a>
you can access the register page on:
http://<WHERE U DEPLOYED IT>/Account/Register
try it and see if all is well ! look in the terminal to see if succeeded.
Configuring Clients
in here you can add API Scopes and Clients
- Scope, in here represents a specific set of permissions or access levels within a resource server. for example, you can create a
devscope for your development apps and another for other things1
new ApiScope("dev-scope", "a Development scope for usage when playing with new things!"),
- Clients are the apps or services that will want to use the server to authenticate
postman client example:
in allowed scopes u can have one or many as long as they are valid/exist. redirect url, is where to send the user after the authentication’s done.
1
2
3
4
5
6
7
8
9
new Client
{
	ClientId = "postman",
	ClientName = "Postman",
	AllowedScopes = { "openid", "profile", "dev-scope"},
	RedirectUris = {"https://www.getpostman.com/oauth2/callback"},
	ClientSecrets = new[] {new Secret("NotASecret".Sha256())},
	AllowedGrantTypes = { GrantType.ResourceOwnerPassword }
},
secrets
- can be as simple as
new Secret("NotASecret".Sha256())or this:1 2 3 4 5 6 7 8
var secret = new Secret { Value = "foo", Type = "bar", Description = "my custom secret", Expiration = new DateTime(2021,12,31) }
if you are on windows u can
scb(openssl rand -base64 32)to get a base 32 string which will have an entropy of ~ 245.
test it
@ https://localhost:5001/connect/token
you need to send a request as
x-www-form-urlencodedwith:
| field | value | explanation |
|---|---|---|
| grant_type | password | what is allowed |
| username | bob | |
| password | Pass123$ | |
| client_id | postman | name of client u sat |
| client_secret | NotASecret | the shared secret |
| scope | dev-scope openid profile | this can be any of the scopes u’ve set |
be wary tho, if ur client is inside a container the
localhostwill be different and the validation of the issuer will fail.
docker compose
- create a docker file in the root folder
1
2
3
4
5
6
7
8
9
10
11
12
13
14
15
16
17
FROM mcr.microsoft.com/dotnet/sdk:7.0 as build

WORKDIR /app
EXPOSE 80 443

COPY . .

RUN dotnet restore

WORKDIR /app/
RUN dotnet publish -c Release -o /app/out

FROM mcr.microsoft.com/dotnet/aspnet:7.0
WORKDIR /app
COPY --from=build /app/out .

ENTRYPOINT [ "dotnet", "auth-server.dll" ]
- create a docker compose file and add ur image to it:
- env file looks like this:
1
2
GUILD_USER=<your username>
GUILD_PASSWORD=<password>
1
2
3
4
5
6
7
8
9
10
11
12
13
14
15
16
17
18
19
20
21
22
23
24
25
26
27
28
29
30
31
version: '2'

services:
  authentication_database:
    image: postgres
    environment:
      - POSTGRES_USER=${GUILD_USER}
      - POSTGRES_PASSWORD=${GUILD_PASSWORD}
    ports:
      - "5435:5432"
    volumes:
      - ./guild_db-data:/var/lib/postgresql/data/
    container_name: users_guild
  authentication_server:
    image: divieon/cerbrus
    build:
      context: .
      dockerfile: Dockerfile
    environment:
      - ASPNETCORE_ENVIRONMENT=Production
      - ASPNETCORE_URLS=http://+:80
      - ConnectionStrings__Postgress=Server=authentication_database;Port=5432;User Id=${GUILD_USER};Password=${GUILD_PASSWORD};Database=AspIdUsers
    depends_on:
      - authentication_database
    ports:
      - 5001:80
    container_name: cerbrus


volumes:
  guild_db-data:
- this way the server has it’s own database but can only be contacted thru http.
try to get a token for a user again: http://localhost:5001/connect/token
SSL in there
you’d need a certificate from a trusted issuer like let’s encrypt but i’m deploying this on a home server, the steps should not differ that much. i’ll just generate a dev cert.
without a proper certificate, the issuer would still be a problem when validating the token, so to get around that add in this in the
HostingExtensions.cs
1
2
3
4
5
6
7
8
builder.Services.AddIdentityServer(options =>
{
	...
	//  /!\  this should match what env u have in docker compose
	if (builder.Environment.IsEnvironment("Production"))
	options.IssuerUri = "identity-server";
	...
}
- you need to generate a certificate and trust it:
- add the cert password to the env file:
CERT_PASSWORD=
- add the cert password to the env file:
1
2
3
4
5
6
## windows
dotnet dev-certs https -ep "$env:USERPROFILE\.aspnet\https\auth-server.pfx"  -p <PASS>
## linux
dotnet dev-certs https -ep ${HOME}/.aspnet/https/auth-server.pfx  -p <PASS>

dotnet dev-certs https --trust
Docker-compose.yml
1
2
3
4
5
6
7
8
9
10
11
12
13
14
15
16
17
18
19
20
21
22
23
24
25
26
27
28
29
30
31
32
33
34
35
36
37
38
39
40
version: '3'

services:
  authentication_database:
    image: postgres
    environment:
      - POSTGRES_USER=${GUILD_USER}
      - POSTGRES_PASSWORD=${GUILD_PASSWORD}
    ports:
      - "5435:5432"
    volumes:
      - ./guild_db-data:/var/lib/postgresql/data/
    container_name: users_guild

  authentication_server:
    image: divieon/homelab-identity-server
    build:
      context: .
      dockerfile: Dockerfile
    environment:
      - ASPNETCORE_ENVIRONMENT=Production
      - ASPNETCORE_URLS=http://+:80
      - ASPNETCORE_URLS=https://+:443
      - ASPNETCORE_HTTPS_PORT:5002
      - ASPNETCORE_Kestrel__Certificates__Default__Password=${CERT_PASSWORD}
      - ASPNETCORE_Kestrel__Certificates__Default__PATH=/https/auth-server.pfx
      - ConnectionStrings__Postgress=Server=authentication_database;Port=5432;User Id=${GUILD_USER};Password=${GUILD_PASSWORD};Database=AspIdUsers

    depends_on:
      - authentication_database
    container_name: cerbrus
    ports:
      - 5001:80
      - 5002:443
    volumes:
      - ${APPDATA}\microsoft\UserSecrets\:/root/.microsoft/usersecrets
      - ${USERPROFILE}\.aspnet\https:/https:ro
volumes:
  guild_db-data:
customizing
the stock option will give u these claims 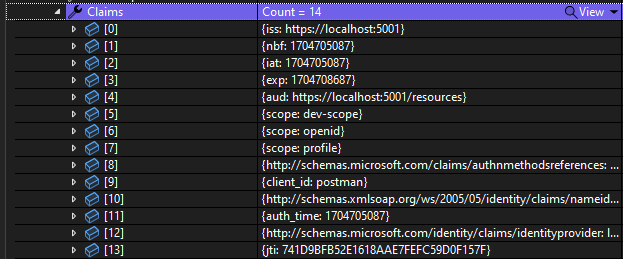
you can extend it thus:
- create a new
Services\CustomProfileService.cs, in it a class that implements theIProfileServiceinterface
1
2
3
4
5
6
7
8
9
10
11
12
13
14
15
16
17
18
19
20
21
22
23
24
25
26
27
28
29
public class CustomProfileService : IProfileService
{
  private readonly UserManager<ApplicationUser> _userManager;

  public CustomProfileService(UserManager<ApplicationUser> userManager)
  {
    _userManager = userManager;
  }
  public async Task GetProfileDataAsync(ProfileDataRequestContext context)
  {
    var user = await _userManager.GetUserAsync(context.Subject);
    var existingClaims = await _userManager.GetClaimsAsync(user);

    var claims = new List<Claim>
        {
	        // your custom claims here !
            new Claim("username", user.UserName)
        };

    context.IssuedClaims.AddRange(claims);
    // add in ur claims;
    context.IssuedClaims.Add(existingClaims.FirstOrDefault(x => x.Type == JwtClaimTypes.Name));
  }

  public Task IsActiveAsync(IsActiveContext context)
  {
    return Task.CompletedTask;
  }
}
integration with other services
dotnet API
- install:
Microsoft.AspNetCore.Authentication.JwtBearer. - in the
program.cs:
basically, but u can add in further options ```c# builder.Services.AddAuthentication(JwtBearerDefaults.AuthenticationScheme) .AddJwtBearer(options => { options.Authority = “https://localhost:5001”; options.RequireHttpsMetadata = true; options.TokenValidationParameters.ValidateAudience = false; // the custom claims you’ve sat options.TokenValidationParameters.NameClaimType = “username”; }); var app = …
// they go in this order! app.UseAuthentication(); app.UseAuthorization();
1
2
3
4
5
- now in a controller class add in the `[Authorize]` decorator
```c#
[Authorize]
[ApiController]
...